
Soft, tender, and wonderfully simple, this White Bread is a dependable homemade loaf with a lightly golden crust and a fluffy interior. The dough comes together with everyday ingredients—flour, yeast, honey, butter, salt, and water—making it an approachable bread to bake whenever you want a fresh loaf at home.

The small amount of honey adds gentle sweetness while the butter gives the crumb a soft, tender texture. After rising and baking, the loaf slices easily for sandwiches, toast, or simply spreading with a little butter while it is still warm.
Why You’ll Love This White Bread
- Simple ingredients: You only need pantry staples and a few basic baking ingredients.
- Soft and tender crumb: Butter and the slightly enriched dough help create a pleasant texture rather than a dense loaf.
- Versatile: Use it for sandwiches, toast, breakfast, or alongside soups and other meals.
- Easy to customize: The honey can be replaced with additional sugar if needed.
- Great homemade staple: Once cooled, the loaf can be sliced and used throughout the week.
Preparation and Tools
A 9-by-5-inch loaf pan is ideal for shaping and baking this amount of dough. You’ll also need a large mixing bowl, a measuring cup, a sturdy spoon or spatula, and a lightly floured work surface for kneading.
Before beginning, make sure the butter used in the dough is softened to room temperature and cubed. The separate butter for brushing should be melted and ready when the loaf is prepared for baking.
The water should feel lukewarm rather than hot. Very hot water can interfere with the yeast, while water that is too cool may slow the rising process.
Preparation Tips
Measure the Flour Carefully
Flour is one of the most important ingredients in bread dough, and adding too much can make the finished loaf heavy. If measuring with cups, spoon the flour into the measuring cup and level it rather than packing it down.
Because flour absorbs water differently depending on humidity and storage conditions, avoid adding extra flour automatically. The dough should become soft and workable as it is kneaded.
Use Lukewarm Water
The water should be comfortably warm to the touch. Extremely hot water can damage the yeast, while cold water can make the dough take considerably longer to rise.
Give the Dough Enough Kneading
Kneading develops gluten, which gives the bread enough structure to rise and hold its shape. The dough should gradually become smoother and more elastic as you work it.
If it feels sticky at first, resist the urge to add a large amount of flour immediately. A slightly tacky dough can become easier to handle as the gluten develops.
Let the Dough Rise Fully
The rising time can vary depending on the temperature of your kitchen. Instead of relying only on the clock, look for the dough to become noticeably larger and airy. A warm, draft-free spot generally helps it rise more consistently.
Ingredients
Lukewarm Water
Water hydrates the flour and activates the yeast. Dividing the water allows it to be incorporated at different stages of preparing the dough.
Yeast
Instant yeast or active dry yeast can be used. Yeast provides the leavening that allows the dough to expand and gives the loaf its light texture.
Sugar and Honey
A little sugar and honey provide mild sweetness and complement the buttery flavor of the bread. The honey can be replaced with more sugar if preferred.
Salt
Salt balances the sweetness and helps develop the overall flavor of the loaf.
Unsalted Butter
Room-temperature butter is worked into the dough to add tenderness and richness. Because it is unsalted, the amount of salt in the recipe remains easier to control.
All-Purpose Flour
All-purpose flour provides the structure needed for the dough. Add it gradually as directed so you can achieve a soft, manageable consistency.
Melted Butter
The additional melted butter is brushed over the loaf before baking, helping contribute to a pleasant buttery finish and golden surface.

Cooking Instructions
Step 1: Prepare the Yeast Mixture
Pour the lukewarm water into a large mixing bowl, reserving the portion needed for the remaining dough. Add the yeast and sugar, then stir gently to combine.
If using active dry yeast, allow the mixture to stand briefly so the yeast can begin activating. If using instant yeast, it can generally be incorporated directly into the dough.
Add the honey and salt, stirring until combined.
Step 2: Begin Adding the Flour
Add part of the all-purpose flour to the bowl and mix until incorporated. Continue adding the remaining flour gradually, stirring between additions.
Once the mixture becomes too thick to stir comfortably, transfer the dough to a lightly floured work surface.
Avoid adding significantly more flour than necessary. The goal is a soft dough that can be kneaded without being excessively sticky.
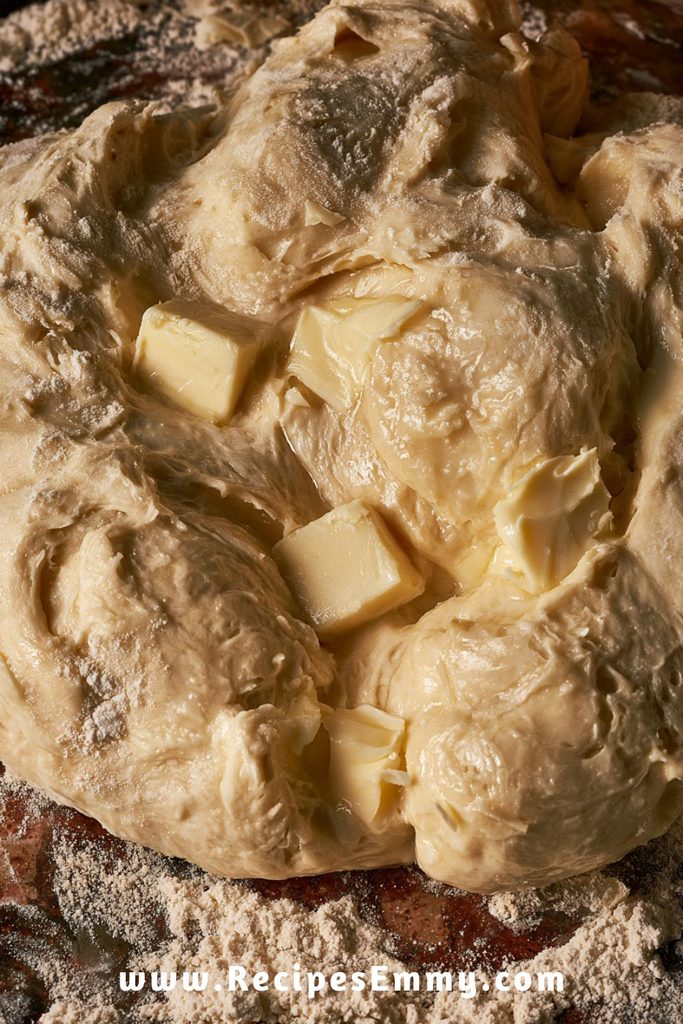
Step 3: Knead in the Butter
Add the room-temperature cubed butter to the dough. Knead it into the dough gradually until the butter is fully incorporated.
Continue kneading until the dough becomes smoother and more elastic. It should feel soft and cohesive rather than dry or crumbly.
This stage is important because kneading develops the gluten network that gives the loaf enough strength to rise.
Step 4: Let the Dough Rise
Place the kneaded dough in a lightly greased bowl and cover it. Leave it in a warm, draft-free area until it has increased noticeably in size.
Depending on the temperature of your kitchen and the yeast used, the timing may vary. The visual cue is more important than a rigid time: the dough should look expanded and airy.
Step 5: Shape the Loaf
Once the first rise is complete, gently remove the dough from the bowl and place it on a lightly floured work surface.
Shape the dough into a loaf that fits comfortably into your prepared loaf pan. Try to create a reasonably even shape so the bread rises uniformly during the second proof.
Place the shaped dough into the pan with the seam positioned underneath.
Step 6: Allow the Loaf to Proof
Cover the shaped dough and let it rise again in a warm area. The dough should become visibly puffy and expand toward the top of the pan.
Avoid rushing this stage. If the dough has not had enough time to rise, the finished bread may be heavier and less airy.
At the same time, avoid letting it rise excessively, as an over-proofed loaf can lose some of its structure.
Step 7: Brush With Melted Butter
Once the loaf has finished its second rise and is ready for the oven, gently brush the surface with the melted butter.
Apply the butter evenly without pressing down on the risen dough. A light coating is enough to add the buttery finish without weighing down the surface.

Step 8: Bake the White Bread
Bake the loaf according to the recipe’s baking temperature until the bread is fully baked and the surface is lightly golden.
The loaf should have a firm, baked exterior while remaining soft inside. Once removed from the oven, let it cool sufficiently before slicing.
Cooling allows the crumb to finish setting, making the loaf easier to cut cleanly without compressing its soft interior.

Notes
- Honey substitute: If you don’t have honey, use additional sugar as specified in the ingredient list.
- Yeast choice: Both instant yeast and active dry yeast work for this loaf. If using active dry yeast, give it a little time to activate in the lukewarm water.
- Soft dough: Avoid adding excessive flour during kneading. A soft dough generally produces a more tender loaf than a stiff, heavily floured one.
- Room-temperature butter: Softened butter incorporates into the dough much more easily than cold butter.
- Cooling: Allow the bread to cool before slicing for the cleanest cuts and best crumb texture.
What to Serve With White Bread
Homemade white bread is versatile enough to work with simple breakfasts, packed lunches, and everyday meals. Because the loaf has a mild buttery flavor and soft crumb, it can be paired with both sweet and savory foods.
Toast and Breakfast Spreads
Slice the cooled bread and toast it until lightly crisp around the edges. It works well with butter, honey, or other favorite breakfast spreads. The slightly sweet flavor from the honey in the dough makes the bread particularly pleasant when toasted.
Sandwiches
The soft crumb makes this loaf a practical choice for sandwiches. Use evenly sliced bread with your favorite sandwich fillings, keeping the slices thick enough to hold the filling without tearing.
Soup and Stews
Serve slices alongside soup or stew for dipping. The bread can also be lightly toasted when you want a little more structure alongside a brothy meal.
Simple Buttered Bread
For an easy side, slice the bread and spread with butter. This is especially enjoyable while the bread is still fresh and has completely cooled enough to slice cleanly.
Storage Instructions
Allow the bread to cool completely before storing it. Keeping it sealed while still warm can trap condensation inside the container and affect the texture.
Store the cooled loaf in an airtight bread bag or other well-sealed container at room temperature for about 3 days. Keep it away from excessive heat and moisture.
For longer storage, freeze the bread. You can freeze the whole loaf or slice it first so individual pieces are easy to remove as needed. Wrap the bread well and place it in a freezer-safe bag or container. For the best quality, use frozen bread within about 2–3 months.
If frozen as slices, individual pieces can be thawed at room temperature or toasted directly from frozen. A whole loaf should be allowed to thaw before slicing.
Make-Ahead Option
The baked loaf can be prepared ahead and frozen once completely cooled. Slicing it before freezing is especially convenient if you mainly plan to use the bread for toast or individual sandwiches.
Estimated Nutrition
Nutrition will vary depending on the exact flour, butter, honey, and serving size used. Based on the supplied ingredients and an estimated loaf yielding about 12 slices, one slice contains approximately 145 calories.
Estimated per serving:
- Calories: 145 kcal
- Carbohydrates: 26 g
- Protein: 4 g
- Fat: 3 g
These values are estimates rather than laboratory-verified nutrition information.
Frequently Asked Questions
Can I use active dry yeast instead of instant yeast?
Yes. The recipe allows either instant yeast or active dry yeast. If using active dry yeast, combine it with the lukewarm water and sugar and give it a little time to activate before continuing with the dough.
Why does the recipe use lukewarm water?
Lukewarm water helps the yeast become active without exposing it to excessive heat. Water that is too hot can interfere with yeast activity, while very cool water can slow the rising process.
Can I replace the honey?
Yes. The supplied recipe specifically allows honey to be replaced with additional sugar. The flavor may be slightly different, but the substitution works when you don’t have honey available.
Why is my dough sticky while kneading?
Bread dough can initially feel somewhat sticky, particularly before the gluten has developed. Continue kneading and avoid immediately adding large amounts of flour. Adding too much flour can make the finished loaf heavier and less tender.
Can I freeze homemade white bread?
Yes. Once completely cooled, the bread can be wrapped well and frozen. Freezing individual slices makes it particularly convenient to take out only what you need.
When should I slice the bread?
Let the loaf cool before slicing. Cutting into very warm bread can compress the crumb and make the slices less clean. Allowing it to cool gives the interior time to finish setting.
Conclusion
This White Bread is a straightforward homemade loaf built around familiar ingredients and simple bread-making techniques. The combination of butter and honey gives it a soft, mildly sweet character, while proper kneading and proofing help create the airy texture associated with a good everyday loaf.
Once you have a fresh loaf ready, it can move easily from breakfast toast to sandwiches or a simple accompaniment for dinner. It is the kind of practical bread recipe that fits naturally into an everyday baking routine.
Print
White Bread
- Total Time: 2 hours 25 minutes
- Yield: 1 loaf, about 12 slices 1x
Description
This homemade White Bread has a soft, tender crumb, a lightly golden crust, and a subtle buttery sweetness from honey and butter. It is a versatile everyday loaf for sandwiches, toast, and simple meals.
Ingredients
- 1 ⅔ cups lukewarm water, divided
- 2 ¼ teaspoons instant yeast, or active dry yeast
- 1 teaspoon sugar
- 1 tablespoon honey, or more sugar
- 1 teaspoon salt
- 1 ½ tablespoons unsalted butter, cubed at room temperature
- 4 ½ cups all-purpose flour, divided
- 1 ½ tablespoons butter, melted for brushing
Instructions
- Add the lukewarm water, yeast, and sugar to a large mixing bowl. Stir gently to combine. If using active dry yeast, allow the mixture to stand briefly so the yeast can activate.
- Add the honey and salt and stir until combined.
- Gradually add the all-purpose flour, mixing between additions until a soft dough forms.
- Transfer the dough to a lightly floured work surface when it becomes too thick to mix comfortably.
- Add the room-temperature cubed butter and knead it into the dough until fully incorporated.
- Continue kneading until the dough becomes smooth, soft, and elastic. Avoid adding excessive flour.
- Place the dough in a lightly greased bowl, cover, and let it rise in a warm, draft-free area until noticeably larger and airy.
- Gently remove the risen dough and shape it into a loaf that fits comfortably in a prepared loaf pan. Place it in the pan with the seam underneath.
- Cover the shaped dough and allow it to rise again until visibly puffy and expanded toward the top of the pan.
- Gently brush the risen dough with the melted butter, taking care not to deflate it.
- Bake the loaf until fully cooked and lightly golden on the surface.
- Remove the bread from the oven and allow it to cool before slicing.
Notes
- Lukewarm water should be warm but not hot to protect the yeast.
- Honey can be replaced with additional sugar.
- Avoid adding excessive flour while kneading, as this can make the loaf dense.
- Let the bread cool before slicing so the crumb can set properly.
- Prep Time: 25 minutes
- Cook Time: 30 minutes
- Category: Breakfast
- Method: Baked
- Cuisine: American
Nutrition
- Serving Size: 1 loaf, about 12 slices
- Calories: 145 kcal
Keywords: white bread, homemade white bread, white bread recipe, soft white bread, easy white bread





Leave a Comment