
Few homemade breads are as satisfying as a crusty loaf that comes together with just flour, salt, yeast, and water. This Easy 3 Ingredient Artisan Bread keeps the ingredient list wonderfully simple while giving you a rustic loaf with a crisp exterior and a soft, chewy center. The dough needs time to rise, but the hands-on preparation is minimal, making this a practical recipe for home bakers who want fresh bread without a complicated process.

The beauty of this bread is in its simplicity. All-purpose flour or bread flour works, and the yeast does the heavy lifting while the dough develops its texture during rising. Once baked, the loaf has the kind of golden crust and airy interior that makes it perfect for tearing apart while warm, slicing for sandwiches, or serving alongside a favorite meal.
Why You’ll Love This Recipe
Only Three Main Ingredients
The recipe uses flour, salt, and yeast as its three main ingredients, with warm water bringing everything together. There are no eggs, milk, butter, sugar, or specialty ingredients required.
Very Little Hands-On Work
You don’t need to knead the dough extensively. The process is primarily about mixing the ingredients thoroughly and allowing the yeast and resting time to develop the dough.
Rustic Artisan Texture
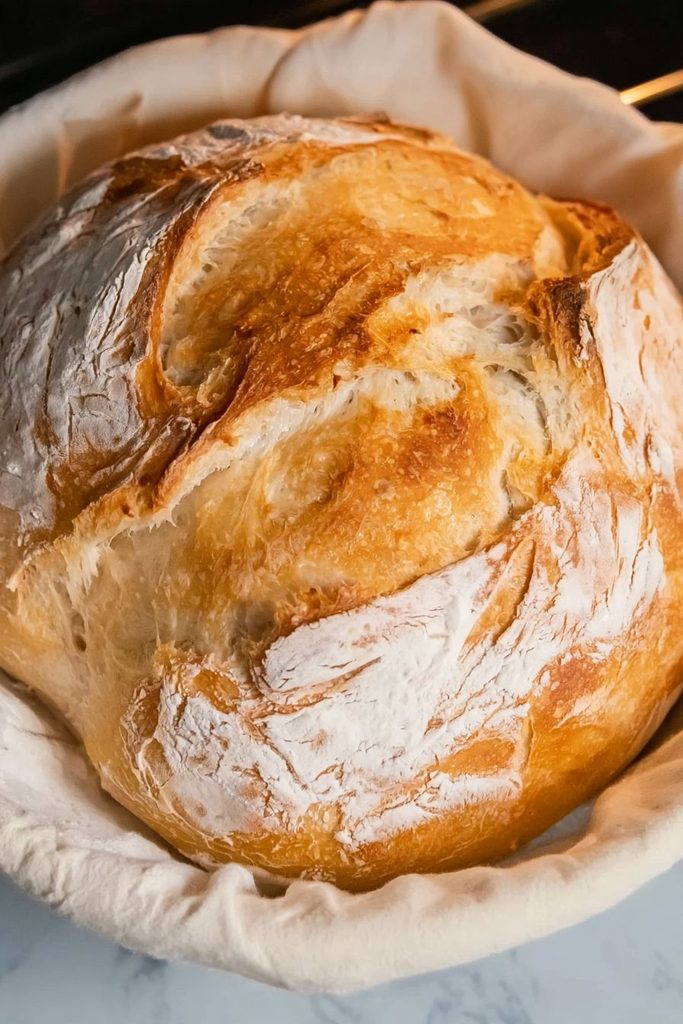
The finished loaf has a hearty, rustic appearance with a crisp crust and a chewy interior. The simple dough is especially suited to an artisan-style loaf rather than a soft sandwich bread.
Flexible Flour Choice
You can use either all-purpose flour or bread flour. Bread flour can give the loaf a particularly chewy structure, while all-purpose flour keeps the recipe convenient since it’s a common pantry staple.
Preparation and Tools
A large mixing bowl is the main piece of equipment you’ll need for preparing the dough. You’ll also want a sturdy spoon or similar utensil for mixing, along with a clean surface for handling the dough when needed.
Because the dough needs time to rise, choose a bowl large enough to accommodate it as it expands. A clean kitchen towel or suitable covering can also be useful for keeping the dough protected while it rests.
Before beginning, measure the flour carefully and have the warm water ready. The water should be around 105°F, which is warm enough to support the yeast without being excessively hot.
Preparation Tips
Use the Right Water Temperature
The temperature of the water matters when working with yeast. Aim for approximately 105°F. Water that is excessively hot can interfere with yeast activity, while water that is too cool may slow the process.
A kitchen thermometer is useful if you have one, especially if you’re not accustomed to judging water temperature by touch.
Choose Your Flour
Both all-purpose flour and bread flour are specified for this recipe. If you already have bread flour in your pantry, it is a good choice for a chewier loaf. All-purpose flour is equally convenient and works well when you want to keep the recipe simple.
Whichever flour you choose, use the same quantity called for in the recipe: 3 cups, or 395 grams.
Measure the Flour Accurately
For the most consistent results, weighing the flour is preferable when possible. The recipe specifies 395 grams, which removes some of the uncertainty that can come from measuring flour by volume.
If using measuring cups, avoid packing the flour tightly into the cup.
Don’t Rush the Dough
Bread dough needs time for the yeast to work. The rising stage is an important part of the process rather than a step to skip. Giving the dough adequate time allows it to develop the structure and texture that make artisan bread distinctive.
Ingredients
All-Purpose Flour or Bread Flour
You’ll need 3 cups (395 grams) of flour. Either all-purpose flour or bread flour can be used. Flour provides the structure for the loaf as the dough develops and bakes.
Kosher Salt
The recipe calls for ½ tablespoon of kosher salt. Salt adds flavor and is an important part of the dough’s overall balance.
Instant or Active Dry Yeast
Use 1 packet (¼ ounce) of instant or active dry yeast, equivalent to 2¼ teaspoons. This is what allows the dough to rise and develop its characteristic bread structure.
Warm Water
You’ll need 1½ cups of water at 105°F. The water hydrates the flour and activates the yeast as the dough comes together.

Cooking Instructions
Mix the Dough
Add the 3 cups (395 grams) of all-purpose flour or bread flour to a large mixing bowl. Add the ½ tablespoon of kosher salt and the ¼-ounce packet of instant or active dry yeast, or 2¼ teaspoons.
Pour in 1½ cups of warm water at 105°F. Mix the ingredients together until the flour is incorporated and a dough forms.
The dough should come together as a cohesive mixture rather than leaving large amounts of dry flour behind. Take your time mixing so the water is distributed throughout the flour.

Let the Dough Rise
Once the dough has been mixed, allow it to rest and rise according to the recipe’s bread-making process. This resting period gives the yeast time to work and allows the dough to develop its characteristic texture.
Keep the dough covered while it rises so the surface does not dry out. The dough should become noticeably more developed and airy during this stage.
Avoid repeatedly disturbing the dough while it is rising. The yeast needs uninterrupted time to work through the mixture.
Shape the Loaf
Once the dough has risen, handle it gently as you prepare it for baking. Artisan bread benefits from maintaining the air that has developed in the dough rather than aggressively working it.
Shape the dough into a rustic loaf, keeping the surface reasonably smooth while preserving the natural character of the dough.
The goal isn’t a perfectly uniform bakery-style shape. A slightly rustic appearance is part of what makes this bread appealing.

Bake Until Crusty and Golden
Transfer the prepared loaf to the appropriate baking setup and bake according to the recipe’s baking process until the bread develops a deeply golden, crisp exterior.
The finished loaf should look substantially different from the raw dough, with a firm crust and a fully baked interior. Allow it to cool appropriately before slicing so the interior has time to settle.
When sliced, the bread should have a chewy texture surrounded by its rustic crust.
Notes
- Flour choice: Use either all-purpose flour or bread flour as specified. Bread flour can produce a chewier loaf, while all-purpose flour is convenient and readily available.
- Water temperature: Keep the water close to 105°F when preparing the dough so the yeast has the proper environment to work.
- Salt measurement: The recipe calls for ½ tablespoon of kosher salt, so measure it carefully rather than adding salt by eye.
- Yeast: Either instant or active dry yeast can be used, with ¼ ounce or 2¼ teaspoons specified for the recipe.
Common Mistakes to Avoid
Using Water That Is Too Hot
Very hot water is not a shortcut for activating yeast faster. Keep the water around 105°F as specified in the recipe.
Adding Too Much Flour
It can be tempting to add extra flour if the dough feels sticky. Resist adding flour beyond the specified amount unless the recipe specifically calls for it. Too much flour can make the finished bread heavier and less tender.
Not Giving the Dough Enough Time
The yeast needs time to work. Rushing the rising process can prevent the dough from developing properly.
Handling the Dough Too Aggressively
Artisan-style bread benefits from gentle handling after the dough has developed. Avoid unnecessarily pressing all the air out of the dough when shaping it.
Cutting the Bread Immediately
Freshly baked bread continues settling after it comes out of the oven. Giving the loaf some time before slicing helps the interior finish setting and makes it easier to achieve clean slices.
What to Serve With Easy 3 Ingredient Artisan Bread
This rustic bread is especially useful because its simple flavor works alongside both hearty meals and lighter dishes.
- Soups: Serve thick slices alongside vegetable, tomato, lentil, or chicken soup. The crisp crust is ideal for dipping.
- Pasta dishes: Use slices to soak up sauce from a tomato-based or creamy pasta.
- Roasted meats: The chewy bread makes a simple side for roasted chicken, beef, or other savory main dishes.
- Salads: Pair a few slices with a fresh green salad for an easy lunch.
- Breakfast or brunch: Toast slices and serve them alongside eggs or your favorite breakfast ingredients.
Storage Instructions
Allow the bread to cool before storing it. Once cooled, keep the loaf at room temperature in a suitable bread bag or other container that protects it from drying out while still allowing the crust to retain some of its texture.
For the best crust, avoid refrigerating the bread unless necessary. Refrigeration can cause bread to lose its desirable texture more quickly.
If you won’t use the entire loaf within a few days, freezing is a practical option. Slice the bread before freezing if you want to remove individual portions easily. Wrap it securely and place it in a freezer-safe container or bag.
When ready to eat, thaw the desired portion and warm it until the crust becomes pleasantly crisp again.
Estimated Nutrition
Because the supplied recipe does not include verified nutritional information, the calorie figure should be treated as an estimate. The actual calories per serving will depend on the number of servings and the specific flour used.
Estimated Calories: approximately 170 calories per serving, assuming the loaf is divided into about 10 servings.
Frequently Asked Questions
Can I use all-purpose flour instead of bread flour?
Yes. The recipe specifically allows either all-purpose flour or bread flour. Use 3 cups (395 grams) of whichever option you have available.
Can I use active dry yeast?
Yes. The recipe specifies either instant or active dry yeast. The amount is one ¼-ounce packet, equivalent to 2¼ teaspoons.
How warm should the water be?
The recipe calls for 1½ cups of water at 105°F. Using the specified temperature helps provide the appropriate conditions for the yeast.
Why does the dough need to rise?
The rising period allows the yeast to work through the dough and helps develop the structure and airy texture associated with artisan bread. Give the dough enough time to develop rather than rushing this stage.
Can I make the dough ahead of time?
The supplied recipe establishes a rising stage but does not provide specific instructions for an overnight or extended make-ahead method. For the most reliable result, follow the recipe’s stated preparation and rising process rather than adding an untested overnight procedure.
How should I store leftover bread?
Once completely cooled, keep the bread at room temperature in a suitable bread bag or container. For longer storage, freeze the bread in a properly sealed freezer-safe container or bag.
Conclusion
Easy 3 Ingredient Artisan Bread shows how far a short ingredient list can go. With flour, salt, yeast, and warm water, you can make a rustic loaf with a crisp golden exterior and chewy interior without complicated ingredients or elaborate preparation. It is a straightforward bread to keep in your recipe collection whenever you want a homemade loaf to accompany a meal.
Print
Easy 3 Ingredient Artisan Bread
- Total Time: 2 hours 45 minutes
- Yield: 1 loaf 1x
Description
This Easy 3 Ingredient Artisan Bread uses flour, kosher salt, yeast, and warm water to create a rustic loaf with a crisp golden crust and chewy interior. With simple preparation and everyday ingredients, it is an easy homemade bread for serving alongside your favorite meals.
Ingredients
- 3 cups (395 grams) all-purpose flour, or bread flour
- ½ tablespoon kosher salt
- ¼ ounce instant or active dry yeast, or 2¼ teaspoons
- 1½ cups warm water, 105°F
Instructions
- Add the 3 cups (395 grams) of all-purpose flour or bread flour to a large mixing bowl. Add the ½ tablespoon of kosher salt and the ¼-ounce packet of instant or active dry yeast, or 2¼ teaspoons. Pour in 1½ cups of warm water at 105°F. Mix until the flour is incorporated and a dough forms.
- Allow the dough to rest and rise according to the recipe’s bread-making process. Keep the dough covered while it rises and allow the yeast time to work.
- Once the dough has risen, handle it gently and shape it into a rustic loaf, preserving the air that has developed in the dough.
- Transfer the prepared loaf to the appropriate baking setup and bake according to the recipe’s baking process until the bread develops a deeply golden, crisp exterior. Allow the loaf to cool appropriately before slicing.
Notes
- You can use either all-purpose flour or bread flour for this recipe.
- Keep the water at approximately 105°F when preparing the dough.
- Allow the bread to cool before slicing so the interior can finish settling.
- Prep Time: 15 minutes
- Cook Time: 30 minutes
- Category: Breakfast
- Method: Baked
- Cuisine: American
Nutrition
- Serving Size: 1 loaf
- Calories: 170 calories
Keywords: easy 3 ingredient artisan bread, 3 ingredient bread, easy artisan bread, homemade artisan bread, crusty bread, rustic bread, easy homemade bread





Leave a Comment