
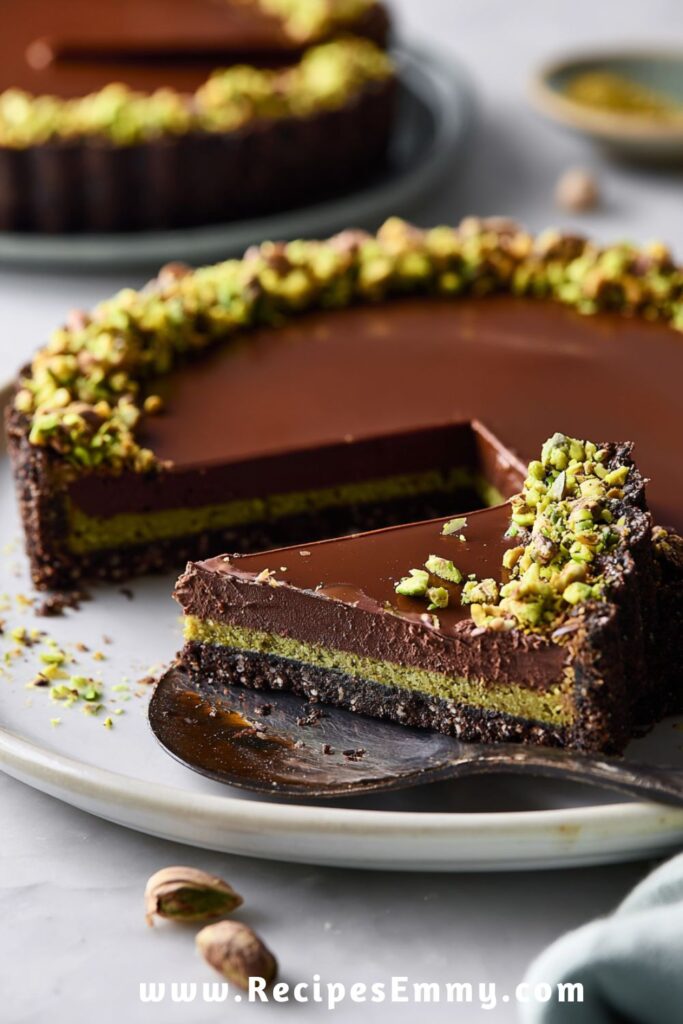
This Dark Chocolate Pistachio Tart combines a naturally sweet, nutty crust with a rich pistachio layer and a smooth dark chocolate ganache. The contrast between the earthy pistachios and deep chocolate makes every slice feel indulgent, while the combination of nuts, maple syrup, and coconut cream keeps the preparation straightforward.
The tart is especially appealing when you want an impressive dessert without relying on traditional pastry dough. The crust comes together from blended nuts, cacao, and maple syrup, while the pistachio paste adds a vibrant layer of flavor underneath the glossy chocolate topping. A sprinkle of chopped pistachios over the ganache finishes it with extra texture and color.
Why You’ll Love This Dark Chocolate Pistachio Tart
- Rich chocolate flavor: Cacao in the crust and vegan dark chocolate in the ganache create plenty of deep chocolate flavor without making the tart overly complicated.
- Pistachio-forward: The homemade pistachio paste gives the tart a distinct nutty flavor that pairs naturally with dark chocolate.
- No traditional pastry crust: The nut-based crust avoids rolling and chilling conventional pastry dough.
- Naturally sweetened: Maple syrup or agave syrup is used throughout the layers instead of granulated sugar.
- Make-ahead friendly: The tart benefits from chilling, making it convenient to prepare before serving.
- Beautiful presentation: The contrast between the dark ganache and green pistachio garnish makes this an eye-catching dessert.
Preparation and Tools
A food processor is the most important tool for this tart. It allows you to turn the nuts into a cohesive crust mixture and process the pistachios into a smooth paste. Depending on the power of your food processor, the pistachio paste may remain slightly textured rather than completely silky, which is perfectly fine.
You’ll also need a tart pan or similarly sized shallow baking dish, preferably one with a removable bottom. This makes it much easier to lift the chilled tart out without disturbing the layers.
For the ganache, use a heatproof bowl and a saucepan or another method suitable for gently warming the coconut cream. The chocolate should melt gradually so the finished ganache stays smooth and glossy.
Preparation Tips
Use unsalted nuts for the crust whenever possible so you can control the overall salt level. Pecans, hazelnuts, walnuts, and cashews can all work, so choose one based on the flavor you prefer. Toasted nuts will give the crust a deeper, more pronounced nutty flavor, while raw nuts produce a milder result.
When preparing the crust, add the maple syrup gradually if necessary. The mixture should hold together when pressed between your fingers without becoming wet or overly sticky. If it seems too crumbly, a small additional amount of syrup can help it bind.
For the pistachio paste, shelled pistachios save considerable preparation time. Process them thoroughly with the maple syrup and vanilla until the mixture becomes spreadable. If you’re using matcha, remember that it is optional; it adds color and a subtle earthy note rather than being essential to the pistachio layer.
For the ganache, finely chop the dark chocolate before combining it with the warm coconut cream. Smaller pieces melt more evenly and help prevent stubborn chunks of chocolate from remaining in the mixture.
Ingredients
The nuts in the crust provide structure and richness, while cacao powder brings a bittersweet chocolate flavor that complements the filling. Maple syrup or agave acts as both the sweetener and binder.
The pistachios are the main flavor of the middle layer. Vanilla adds warmth and rounds out their natural nuttiness, while optional matcha can intensify the green color and add a mild earthy character.
The full-fat coconut cream gives the ganache its creamy texture. Chilled coconut cream is particularly useful because it provides a richer consistency than a thinner coconut milk. Vegan dark chocolate supplies the main chocolate flavor, while maple syrup balances its bitterness.
Cooking Instructions
Step 1: Prepare the Nutty Chocolate Crust
Add the pecans, hazelnuts, walnuts, or cashews to a food processor along with the cacao powder and sea salt. Pulse until the nuts are finely broken down and the mixture resembles coarse crumbs.
Add the maple syrup or agave syrup and process again until the mixture begins to clump together. Stop and check the consistency. When pressed between your fingers, it should hold together. If it remains too dry, add a little more syrup and process briefly.
Avoid processing for too long once the mixture has come together. Over-processing can release too much oil from the nuts and make the crust unnecessarily greasy.
Step 2: Press the Crust Into the Pan
Transfer the crust mixture to your tart pan. Use your fingers or the flat bottom of a glass to press it firmly across the base.
Work the mixture into an even layer, paying particular attention to the edges. A compact crust is important because it needs to support the pistachio and chocolate layers once the tart is cut.
If your tart pan has a removable bottom, make sure the crust reaches evenly into the corners without leaving thin spots.
Step 3: Make the Pistachio Paste
Add the shelled pistachios, maple syrup or agave syrup, and vanilla bean paste or vanilla extract to a clean food processor.
Process until the pistachios become a thick, spreadable paste. Scrape down the sides as needed so everything is processed evenly.
If using matcha powder, add it during this step and process until fully incorporated. Taste the mixture and check that the consistency is suitable for spreading. It should be thick enough to stay in place rather than running across the crust.
Step 4: Add the Pistachio Layer
Spread the pistachio paste evenly over the prepared crust. Use a small offset spatula or the back of a spoon to smooth the surface.
Take your time with this layer because an even pistachio filling will make the finished tart easier to slice and give you a cleaner contrast between the green pistachio layer and dark chocolate topping.
Place the tart in the refrigerator while you prepare the ganache. Chilling helps the pistachio layer become more stable before the warm chocolate mixture is added.
Step 5: Prepare the Dark Chocolate Ganache
Finely chop the vegan dark chocolate and place it in a heatproof bowl.
Warm the chilled full-fat coconut cream gently until heated through. It should be hot enough to melt the chocolate but does not need to be aggressively boiled.
Pour the warm coconut cream over the chopped chocolate and allow it to sit briefly so the chocolate begins to soften. Stir gently until the chocolate melts into a smooth mixture.
Add the maple syrup or agave syrup and sea salt, stirring until completely combined. The finished ganache should be smooth, rich, and pourable.
Step 6: Finish the Tart
Pour the chocolate ganache over the pistachio layer. Gently spread it toward the edges to create an even top.
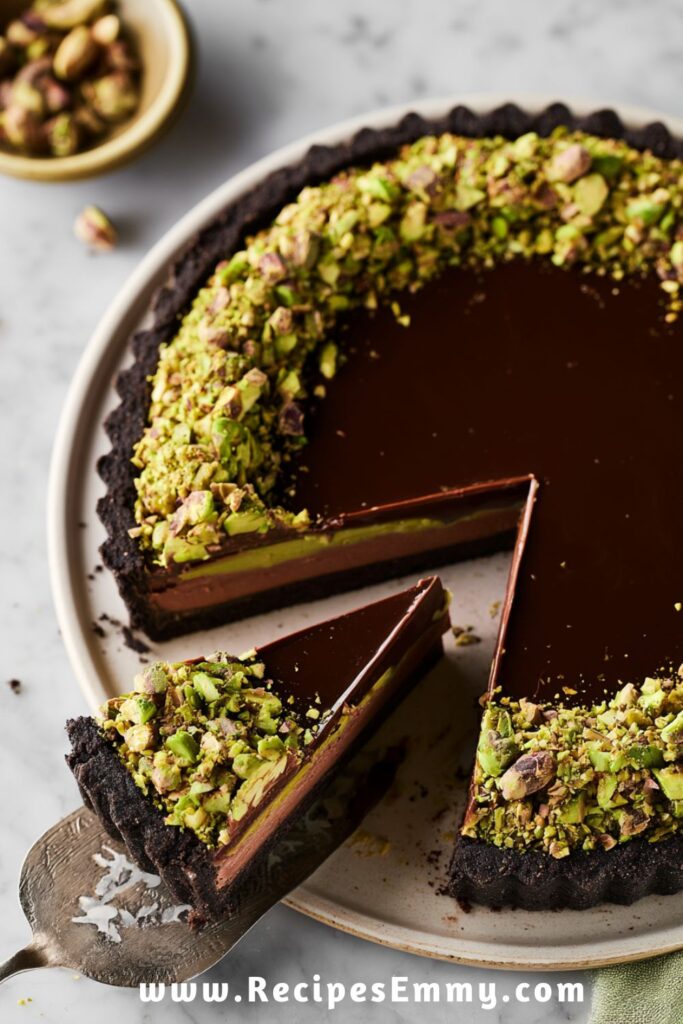
Sprinkle the chopped pistachios over the surface while the ganache is still soft. They will add a pleasant contrast to the creamy chocolate and make the tart visually striking.
Refrigerate the tart until the ganache has set and the layers are firm enough to slice cleanly. For the neatest slices, use a sharp knife and wipe the blade between cuts.
Notes
The nut crust is flexible, so you can use pecans, hazelnuts, walnuts, or cashews depending on the flavor you want. Pecans give the crust a naturally buttery taste, hazelnuts emphasize the chocolate pairing, walnuts add a slightly more robust flavor, and cashews create a milder base.
For a more pronounced pistachio flavor, use good-quality shelled pistachios and process them until they reach a thick, creamy consistency. If you prefer some texture, stop processing slightly earlier so small pistachio pieces remain in the paste.
The matcha powder is completely optional. It can make the pistachio layer greener and adds a subtle earthy flavor, but leaving it out keeps the pistachio flavor more straightforward.
If the crust mixture feels too dry to press together, add a small amount of additional maple syrup or agave. Add it gradually rather than all at once because the required amount can vary depending on the type of nuts used.
Common Mistakes to Avoid
Making the Crust Too Dry
A crust that does not hold together when pressed will be difficult to slice and may crumble when the tart is served. Check the mixture before transferring it to the pan. If it doesn’t compact easily, process in a little additional maple syrup or agave.
Over-Processing the Nuts
The crust needs finely chopped nuts, not necessarily a completely smooth nut butter. Processing for too long can release excess oil and change the texture. Stop once the mixture resembles moist crumbs that clump when pressed.
Leaving the Pistachio Paste Too Coarse
Pistachios need enough processing to combine with the maple syrup and vanilla into a spreadable paste. Scrape the sides of the food processor periodically so the mixture develops evenly.
Pouring the Ganache on Too Hot
The ganache should be smooth and pourable, but giving the pistachio layer some time to chill helps keep the layers distinct. If the chocolate mixture is extremely hot, it can soften the pistachio layer and make it harder to create clean layers.
Cutting Before the Ganache Sets
This tart needs adequate chilling time before slicing. Cutting it while the ganache is still soft can cause the chocolate layer to spread and make the pistachio filling shift. Let the tart become firm before serving.
What to Serve With Dark Chocolate Pistachio Tart
This tart is rich enough to stand on its own, but a few simple additions can complement its deep chocolate and nutty flavors.
- Fresh berries: Raspberries or strawberries add brightness and a little acidity that balances the richness of the chocolate.
- Fresh fruit: Sliced pears or strawberries provide a lighter contrast to the dense tart.
- Coconut whipped cream: A spoonful of lightly sweetened coconut whipped cream adds a soft, airy texture alongside the firm ganache.
- Coffee or espresso: The bitterness of coffee works particularly well with dark chocolate and pistachios.
- Tea: Black tea or a lightly flavored herbal tea makes a simple accompaniment when serving the tart as an afternoon dessert.
For the cleanest presentation, keep the accompaniments fairly simple. The pistachio layer, dark ganache, and chopped pistachios already provide plenty of flavor and visual contrast.
Storage Instructions
Store the finished tart covered in the refrigerator. Keeping it chilled helps the chocolate ganache remain firm and keeps the pistachio layer stable.
For the best texture, allow individual slices to sit at room temperature briefly before serving. This takes some of the firmness out of the chilled ganache while keeping the tart structured.
The tart can be prepared ahead of time, which makes it particularly convenient for entertaining. Prepare it completely, chill until firm, then keep it refrigerated until you’re ready to serve.
If freezing, wrap the fully chilled tart well to protect it from freezer odors and moisture. Thaw it in the refrigerator rather than at room temperature so the layers soften gradually and retain their structure.
Estimated Nutrition
Nutrition will vary depending on the specific nuts, chocolate, coconut cream, and sweetener used. As an estimate, one slice of this tart may provide approximately 430–500 calories per serving, depending on how many servings the tart is divided into.
Because the recipe contains substantial amounts of nuts, chocolate, coconut cream, and syrup, the finished dessert is naturally rich and energy-dense.
Frequently Asked Questions
Can I use a different type of nut for the crust?
Yes. The crust can be made with pecans, hazelnuts, walnuts, or cashews. Each option changes the flavor slightly, but all are included in the supplied ingredient list.
Can I leave out the matcha?
Absolutely. Matcha is optional and mainly contributes additional color and an earthy note. The pistachio paste works without it.
Can I use vanilla extract instead of vanilla bean paste?
Yes. The recipe allows either vanilla bean paste or vanilla extract. Use whichever you have available.
Why does the tart need to be refrigerated?
Chilling allows the pistachio layer and chocolate ganache to firm up. This makes the tart easier to slice and helps the individual layers stay together when served.
Can I make this tart ahead of time?
Yes. This is a good make-ahead dessert because the tart needs chilling before serving. Prepare it in advance and keep it refrigerated until you’re ready to serve.
How can I get cleaner slices?
Make sure the tart is thoroughly chilled before cutting. Use a sharp knife and wipe the blade clean between slices. If you prefer a slightly softer chocolate texture, let each slice sit at room temperature briefly before serving.
Conclusion
Dark Chocolate Pistachio Tart brings together three distinct textures: a firm, nutty cacao crust, a rich pistachio paste, and a smooth dark chocolate ganache. The chopped pistachios on top add just enough crunch to finish each slice. With no traditional pastry dough to roll out and a filling that can be prepared ahead, it’s an elegant dessert that’s surprisingly approachable for a home kitchen.
Print
Dark Chocolate Pistachio Tart
- Total Time: 6 hours 30 minutes
- Yield: 12 servings 1x
Description
Treat yourself to this luxurious Dark Chocolate Pistachio Tart, a rich and creamy dessert featuring a chocolate nut crust, silky homemade pistachio paste, and smooth vegan dark chocolate ganache. Perfect for holidays, dinner parties, or whenever you’re craving an elegant dessert, this easy recipe is naturally dairy-free, vegan-friendly, and packed with irresistible chocolate and pistachio flavor. It’s a wonderful choice for dessert ideas, special occasions, easy recipes, and homemade treats.
Ingredients
For the Crust
- 200 g pecans, hazelnuts, walnuts, or cashews
- 70 g cacao powder or unsweetened cocoa powder
- ½ teaspoon sea salt
- 50 ml maple syrup or agave syrup, plus extra if needed
For the Pistachio Paste
- 150 g shelled pistachios
- 50 ml maple syrup or agave syrup
- 2 teaspoons vanilla bean paste or vanilla extract
- 1 teaspoon matcha powder (optional)
For the Chocolate Ganache
- 350 g chilled full-fat coconut cream
- 170 g vegan dark chocolate, finely chopped
- 60 g maple syrup or agave syrup
- ¼ teaspoon sea salt
- 50 g chopped pistachios for garnish
Instructions
- Blend the crust ingredients until sticky and press into a tart pan.
- Chill the crust while preparing the pistachio layer.
- Blend pistachios, maple syrup, vanilla, and matcha until smooth.
- Spread the pistachio paste evenly over the crust.
- Warm the coconut cream and pour it over the chopped chocolate.
- Stir until smooth, then mix in maple syrup and sea salt.
- Pour the ganache over the pistachio layer.
- Refrigerate for 4–6 hours or overnight.
- Garnish with chopped pistachios.
- Slice and serve chilled.
Notes
- Chill the tart overnight for the best texture.
- Use only the thick coconut cream for a firm ganache.
- Warm your knife before slicing for clean, beautiful pieces.
- Prep Time: 30 minutes
- Category: Dessert
- Method: No-Bake
- Cuisine: American
Keywords: Dark Chocolate Pistachio Tart, vegan chocolate tart, pistachio tart recipe, no bake chocolate tart, dairy free dessert, vegan dessert recipe, dark chocolate dessert, homemade tart recipe, elegant dessert ideas, holiday dessert, chocolate ganache tart, healthy dessert ideas, gluten free tart, easy vegan dessert, pistachio dessert recipe

Leave a Comment