
Halloween Pizza Skulls turn a familiar cheesy pizza into a fun centerpiece for an October dinner, Halloween party, or kid-friendly meal. Pizza dough is filled with pizza sauce, mozzarella, Parmesan, and your favorite toppings, then baked in skull-shaped molds until the edges are golden and the cheese is bubbling. The skull shape gives them their spooky look, while the filling keeps every bite savory, cheesy, and satisfying.
The recipe is also flexible enough to suit different tastes. Use sausage and pepperoni for a hearty version, or add black olives, ham, bacon, spinach, corn, or mini Italian meatballs to create your own combinations. Served with warm marinara for dipping and a little fresh parsley or basil, these individual pizzas are easy to share and especially fitting for a Halloween gathering.

Why You’ll Love This Recipe
- Perfect for Halloween: The skull molds transform ordinary pizza into a festive dish without requiring complicated decorating.
- Easy to customize: You can use one topping combination throughout or make each skull different.
- Cheesy and satisfying: Mozzarella provides the main gooey cheese layer, while Parmesan adds a more savory, salty flavor.
- Great for parties: Individual skull-shaped pizzas are easy to portion and serve.
- Uses convenient ingredients: Pre-made pizza dough and prepared pizza sauce keep the preparation straightforward.
- Fun dipping option: Warm marinara on the side gives the baked pizza an extra burst of tomato flavor.
Preparation and Tools
The most important piece of equipment is a skull-shaped baking mold designed for oven use. The shape of the mold gives the pizzas their recognizable Halloween appearance and helps create individual portions. Lightly grease the mold before adding the dough so the baked pizzas release more easily.
If you’re using fresh pizza dough sold in a ball, allow it to come to room temperature for a little while before rolling. Room-temperature dough is generally easier to stretch and press into the skull cavities without immediately springing back.
You’ll also need a rolling pin if your dough is not already rolled out, a small spoon for spreading the pizza sauce, a knife or kitchen scissors for trimming excess dough, and a bowl or small dish for preparing your toppings. Have a baking sheet or another heat-safe surface ready for handling the hot mold after baking.
Preparation Tips
Bring the dough to a workable temperature. Cold dough can be difficult to stretch into the skull mold and may resist being shaped. Letting it sit briefly before working with it makes the process easier.
Don’t overfill the skull cavities. It can be tempting to add plenty of cheese and toppings, but too much filling can make the dough difficult to close and may cause ingredients to spill out during baking. A moderate layer of sauce, cheese, and toppings gives you a better balance between filling and dough.
Pat watery toppings dry. Ingredients such as sliced olives or cooked spinach can introduce extra moisture. Drain them well before adding them to the pizzas so the dough has a better chance of baking properly.
Cook raw meat before using it. The ingredient list calls for cooked sausage, cooked bacon, and mini Italian meatballs. Make sure these are fully cooked before they go into the pizza skulls because the baking step is primarily intended to cook the assembled pizzas and melt the cheese.
Cut larger toppings into small pieces. Chopped ham, small pieces of sausage, mini pepperoni, and finely chopped vegetables fit into the skull-shaped cavities more easily than large pieces.
Use the cheese strategically. Mozzarella gives the pizzas their stretchy, melted texture, while Parmesan contributes a stronger savory flavor. Keeping some mozzarella between the toppings helps bind the filling together as it melts.
Ingredients
Pizza Dough and Cheese
Pre-made pizza dough: The 13 to 16 ounces of dough forms the outer shell of the individual pizza skulls. Either boxed rolled-out dough or fresh dough can work, as long as it can be shaped to fit the mold.
Pizza sauce: About ¾ to 1 cup provides the tomato base. Use enough to add flavor without making the dough overly wet.
Shredded mozzarella: Two cups create the main cheesy filling and melt into the toppings as the pizzas bake.
Parmesan cheese: About ¼ cup adds a sharper, savory note that complements the mozzarella and pizza sauce.
Choose Your Favorite Toppings
The toppings can be mixed and matched according to what you have available. Cooked sausage adds a substantial, meaty filling, while mini pepperoni works particularly well because its small size fits naturally into individual skulls. Black olives bring a salty flavor, chopped ham adds mild savory richness, and crispy bacon contributes a smoky, crunchy element.
Mini Italian meatballs can make the skulls especially hearty, while corn adds a little sweetness and color. Baby spinach and fresh basil offer lighter, fresh-tasting options that work well alongside the rich cheese.
For six pizza skulls, the supplied amounts include about 8 ounces of cooked sausage or about 6 ounces of mini pepperoni when using those as the primary meat topping.

Cooking Instructions
Step 1: Prepare the Oven and Skull Mold
Preheat the oven according to the baking temperature appropriate for your pizza dough and skull-shaped baking mold. Lightly grease the skull cavities so the finished pizzas can be removed more easily after baking.
Set the prepared mold on a stable work surface while you prepare the dough and toppings.
Step 2: Prepare the Pizza Dough
If you’re using fresh pizza dough from a ball, roll it out on a lightly floured surface until it is large enough to portion into the skull cavities. Aim for an even thickness so the dough cooks consistently.
Cut or divide the dough into pieces large enough to line each skull cavity with some dough extending slightly beyond the edges. Press the dough gently into the contours of the mold, making sure it reaches into the deeper areas that form the skull’s features.
Take care not to stretch the dough so thin that it tears. If a small tear develops, gently press the surrounding dough together to seal it.

Step 3: Add the Pizza Sauce
Spoon a small amount of pizza sauce into each dough-lined skull. Spread it across the base while leaving enough room around the edges for the dough to be folded or sealed.
Because the skulls are individually shaped, avoid flooding the cavities with sauce. A thin, even layer is enough to provide tomato flavor without making the dough difficult to handle.
Step 4: Layer in the Cheese and Toppings
Add shredded mozzarella over the sauce, followed by your selected toppings. You can use sausage, mini pepperoni, olives, ham, bacon, mini Italian meatballs, corn, spinach, basil, or a combination.
Keep the pieces relatively small and distribute them evenly so each skull receives a balanced amount of filling.
Finish with Parmesan and another light layer of mozzarella if desired, taking care not to overfill the mold.
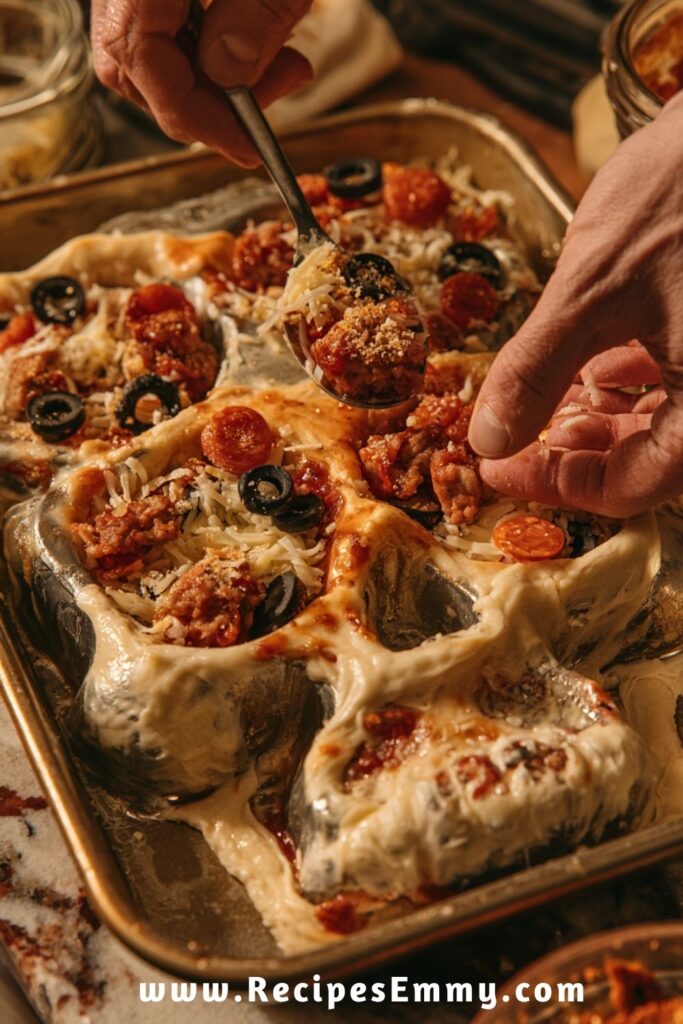
Step 5: Cover and Seal the Pizza Skulls
Bring the exposed dough over the filling where the shape of your mold allows, gently pressing the dough together to enclose the ingredients. Check the edges carefully and pinch together any areas that need sealing.
A good seal helps keep the melted cheese and toppings inside the pizza rather than allowing them to escape during baking.
Step 6: Bake Until Golden and Bubbling
Place the filled skull mold in the preheated oven and bake according to the dough and mold’s recommended baking temperature and time.
Watch for visual cues rather than relying only on the clock. The dough should be cooked through and lightly golden, while the cheese should be melted and bubbling. The exact baking time can vary depending on the thickness of the dough, the size and material of the mold, and how generously the skulls are filled.
Step 7: Cool Briefly and Serve
Once baked, carefully remove the mold from the oven and allow the pizza skulls to rest briefly. The cheese will be extremely hot immediately after baking, and a short rest makes them easier to handle.
Gently remove the skulls from the mold and arrange them on a serving plate. Serve warm with marinara sauce for dipping and finish with chopped parsley or fresh basil.
Notes
If you’re preparing several different topping combinations, keep the fillings relatively consistent in quantity so the skulls bake at a similar rate. You can also label or remember which toppings are in each skull before baking if you’re making different versions for a group.
For a more pronounced pizza flavor, use a combination of mozzarella and Parmesan rather than relying on mozzarella alone. The Parmesan adds extra savory depth without requiring a large amount.
Fresh basil is best added after baking when you want its fresh flavor to remain noticeable. Baby spinach can be incorporated into the filling, but squeeze or drain it well first if it has been cooked.
What to Serve With Halloween Pizza Skulls
Halloween Pizza Skulls are substantial enough to serve as the main dish, but a few simple sides can round out the meal without competing with the playful pizza presentation.
- Simple green salad: A crisp salad adds freshness alongside the rich mozzarella, Parmesan, and savory toppings.
- Roasted vegetables: Roasted vegetables provide a warm side that works especially well for a Halloween dinner.
- Fresh fruit: A bowl of sliced fruit offers a lighter contrast to the cheesy pizzas, particularly for a family gathering.
- Extra marinara sauce: Keep additional warm marinara on the table for anyone who wants more sauce for dipping.
- Garlic bread: A small serving of garlic bread works well when the pizza skulls are part of a larger Halloween meal.
For a party, place the warm pizza skulls on a platter with small bowls of marinara around them. The individual portions make them easy for guests to pick up and dip.
Storage Instructions
Allow leftover pizza skulls to cool before storing them. Place them in an airtight container and refrigerate them promptly. For the best texture, enjoy refrigerated leftovers within 3 to 4 days.
To reheat, use an oven or toaster oven when possible. Reheating on a baking sheet helps bring back some of the crispness of the dough while warming the cheese and toppings. A microwave can also be used for convenience, although the crust will generally be softer.
If you know you will have leftovers, avoid leaving the pizza skulls sitting at room temperature for an extended period, especially when they contain cooked meat and cheese.
Can You Make Them Ahead?
The individual components can be prepared ahead, particularly the cooked toppings. Cooked sausage, bacon, and other meat toppings can be ready in advance and refrigerated until you’re ready to assemble the pizzas.
For the best finished texture, assemble and bake the skulls relatively close to serving time. This keeps the dough from sitting with sauce inside it for too long before baking.
Can You Freeze Halloween Pizza Skulls?
Freezing is possible, although the texture of the dough may change slightly after thawing and reheating. If freezing leftovers, cool them completely and store them in a well-sealed freezer-safe container or wrap them securely to help prevent freezer burn.
Reheat thoroughly until the center is hot and the cheese is melted. For better crust texture, an oven or toaster oven is preferable to a microwave.
Estimated Nutrition
Because the recipe allows different topping combinations and does not specify exact quantities for every optional topping, nutrition can vary considerably. The following is a rough estimate based on the supplied dough, pizza sauce, mozzarella, Parmesan, and a moderate meat topping portion.
Estimated per serving: approximately 450–550 calories
Actual calories will depend on the type of pizza dough and sauce used, the amount of cheese added, and which optional toppings are selected.
Frequently Asked Questions
Can I use refrigerated pizza dough?
Yes. Fresh pre-made pizza dough sold in a ball can be used. Let it come to a workable temperature before rolling so it is easier to stretch and press into the skull mold.
Do I have to use all of the topping options?
No. The topping list is intended to give you choices. You can use sausage, mini pepperoni, olives, ham, bacon, mini meatballs, corn, spinach, basil, or combinations that suit your preferences.
Can I use regular pepperoni instead of mini pepperoni?
Yes, but larger pepperoni slices may need to be cut into smaller pieces so they fit comfortably inside the skull-shaped cavities and don’t interfere with sealing the dough.
Why shouldn’t I overfill the skull molds?
Too much filling can make it difficult to close and seal the dough. Excess cheese and toppings can also spill out during baking. Keeping the filling moderate allows the dough to enclose the pizza ingredients more effectively.
Can I use different cheeses?
The supplied recipe uses mozzarella and Parmesan. If you make a substitution, choose a cheese that melts well and consider how its moisture and flavor will affect the filling. Keep the quantity moderate so the skulls aren’t overloaded.
How do I keep the dough from sticking to the mold?
Lightly grease the skull-shaped baking mold before adding the dough. Press the dough into the contours gently rather than forcing it into the cavities, and allow the baked pizzas to rest briefly before carefully removing them.
Conclusion
Halloween Pizza Skulls make an ordinary pizza night feel much more festive with very little extra complexity. The skull-shaped mold creates the Halloween presentation, while pizza sauce, melted mozzarella, Parmesan, and customizable toppings provide the familiar flavors everyone expects from a good homemade pizza.
Prepare the toppings ahead when convenient, avoid overfilling the molds, and watch for golden dough and bubbling cheese as the main signs that the skulls are ready. Serve them warm with marinara for dipping, and you have a playful Halloween meal that’s easy to customize for family dinners or seasonal gatherings.
Print
Halloween Pizza Skulls
- Total Time: 35 minutes
- Yield: 6 pizza skulls 1x
Description
These Halloween Pizza Skulls are fun, cheesy individual pizzas made with pizza dough, pizza sauce, mozzarella, Parmesan, and your favorite pizza toppings, baked in skull-shaped molds and served with marinara for dipping.
Ingredients
Pizza Skulls
- 13 to 16 ounces pre-made pizza dough, boxed rolled-out dough or fresh pizza dough
- 3/4 to 1 cup pizza sauce
- 2 cups shredded mozzarella
- 1/4 cup Parmesan cheese
Choose Your Favorite Toppings
- 8 ounces cooked sausage, for 6 pizza skulls
- 6 ounces mini pepperoni, for 6 pizza skulls
- Sliced black olives
- Sliced ham, chopped
- Crumbled crispy bacon
- Mini Italian meatballs
- Cooked corn kernels
- Baby spinach
- Fresh basil
To Serve
- Marinara sauce for dipping
- Chopped parsley or basil
Instructions
- Preheat the oven according to the baking temperature recommended for your pizza dough and skull-shaped baking mold. Lightly grease the skull-shaped cavities.
- If using fresh pizza dough, roll it out on a lightly floured surface to an even thickness. Divide the dough into pieces large enough to line each skull cavity with a little dough extending beyond the edges.
- Gently press the dough into the contours of each skull cavity, taking care not to stretch it so thin that it tears.
- Spoon a thin, even layer of pizza sauce into each dough-lined cavity.
- Add shredded mozzarella, followed by your chosen toppings. Keep the toppings relatively small and distribute them evenly.
- Sprinkle Parmesan over the filling and add a little additional mozzarella if desired. Do not overfill the cavities.
- Bring the exposed dough over the filling where possible and gently press or pinch the edges together to seal the pizza skulls.
- Place the filled mold in the preheated oven and bake according to the dough and mold’s recommended baking time and temperature. Bake until the dough is cooked through and lightly golden and the cheese is melted and bubbling.
- Carefully remove the mold from the oven and allow the pizza skulls to rest briefly.
- Gently remove the skulls from the mold and serve warm with marinara sauce for dipping. Garnish with chopped parsley or fresh basil.
Notes
- Lightly grease the skull-shaped mold before adding the dough to make the baked pizzas easier to remove.
- Avoid overfilling the skull cavities. Too much sauce, cheese, or toppings can make the dough difficult to seal.
- For the best texture when reheating leftovers, use an oven or toaster oven rather than a microwave.
- Prep Time: 20 minutes
- Cook Time: 15 minutes
- Category: Appetizers
- Method: Baked
- Cuisine: Italian-American
Nutrition
- Serving Size: 6 pizza skulls
- Calories: 450–550 calories
Keywords: halloween pizza skulls, pizza skulls, halloween pizza, skull pizza recipe, halloween pizza recipe



Leave a Comment